Your Custom Text Here
Woven Experiment No.68 - Smooth and texture


Woven Experiment No.68 - Smooth and texture
With this experiment I wanted to try and combine the texture of a woven section with a smooth area to see what results the combination would create.
A solid core of plaster was cast and carved into an oval form, then a covering of smooth wax and then a detail figure 8 swirl wrapping around the form.
With this experiment I found I had a more finished look than with any other piece so far. It required very little welding on the red wax as the weaving was made using a continuous length of 3mm wax.
The sticky wax smoothes to a degree with the fingers but it can cause drag. Using a tea spoon heated in boiling water seems to work to smooth out areas. But the question is how much to work something? should the smooth wax be completely void of marks or would it add to the sculpture to leave behind finger prints, dints and other small features?
Introducing a new texture and a new wax
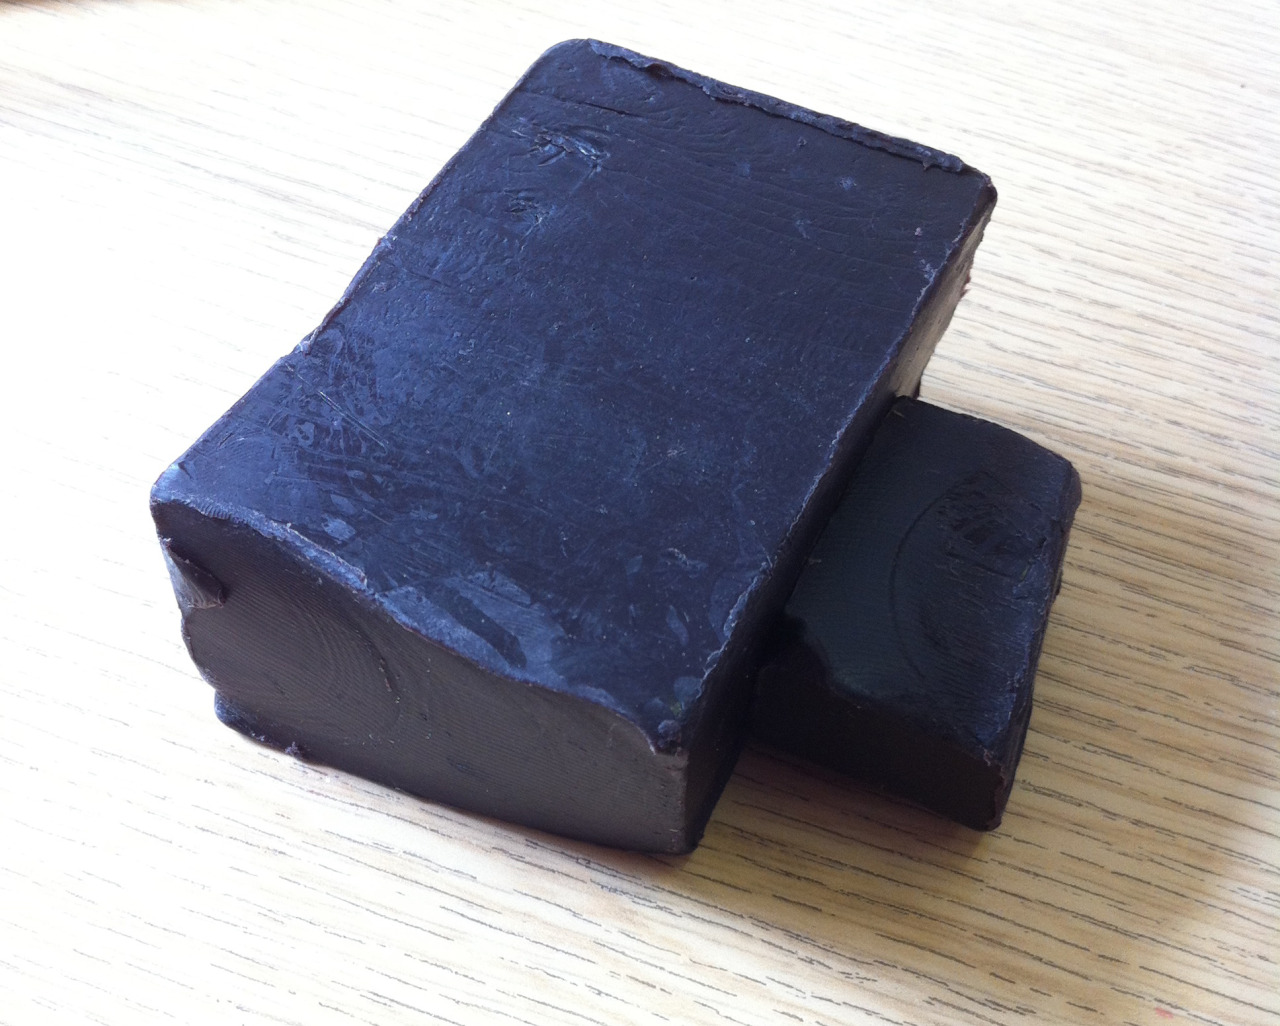


Introducing a new texture and a new wax.
The new wax that comes in a solid block works very differently from the red wax and much more like a polymer clay than a wax.
My first attempt at applying it was to pull of small sections from the block and apply it directly to the plaster core like building up an area of clay work. This didn’t work, I tried smoothing each of the pieces to adhere it to the first but the dusty surface of the plaster core prevented it from adhering and instead the back of the wax became covered in a powdery residue.
My next attempt was slicing it down into smaller sections and warming it up in the palm of my hand until it was able to be pinched and pushed into a small slab. When the wax slab was placed onto the core it still did not stick to the plaster but it did stick to the waxed thread.
With the next slice I warmed and flattened a larger piece and this, when applied to the core, stuck to more than one guide line of waxed thread and adhered much more successfully.
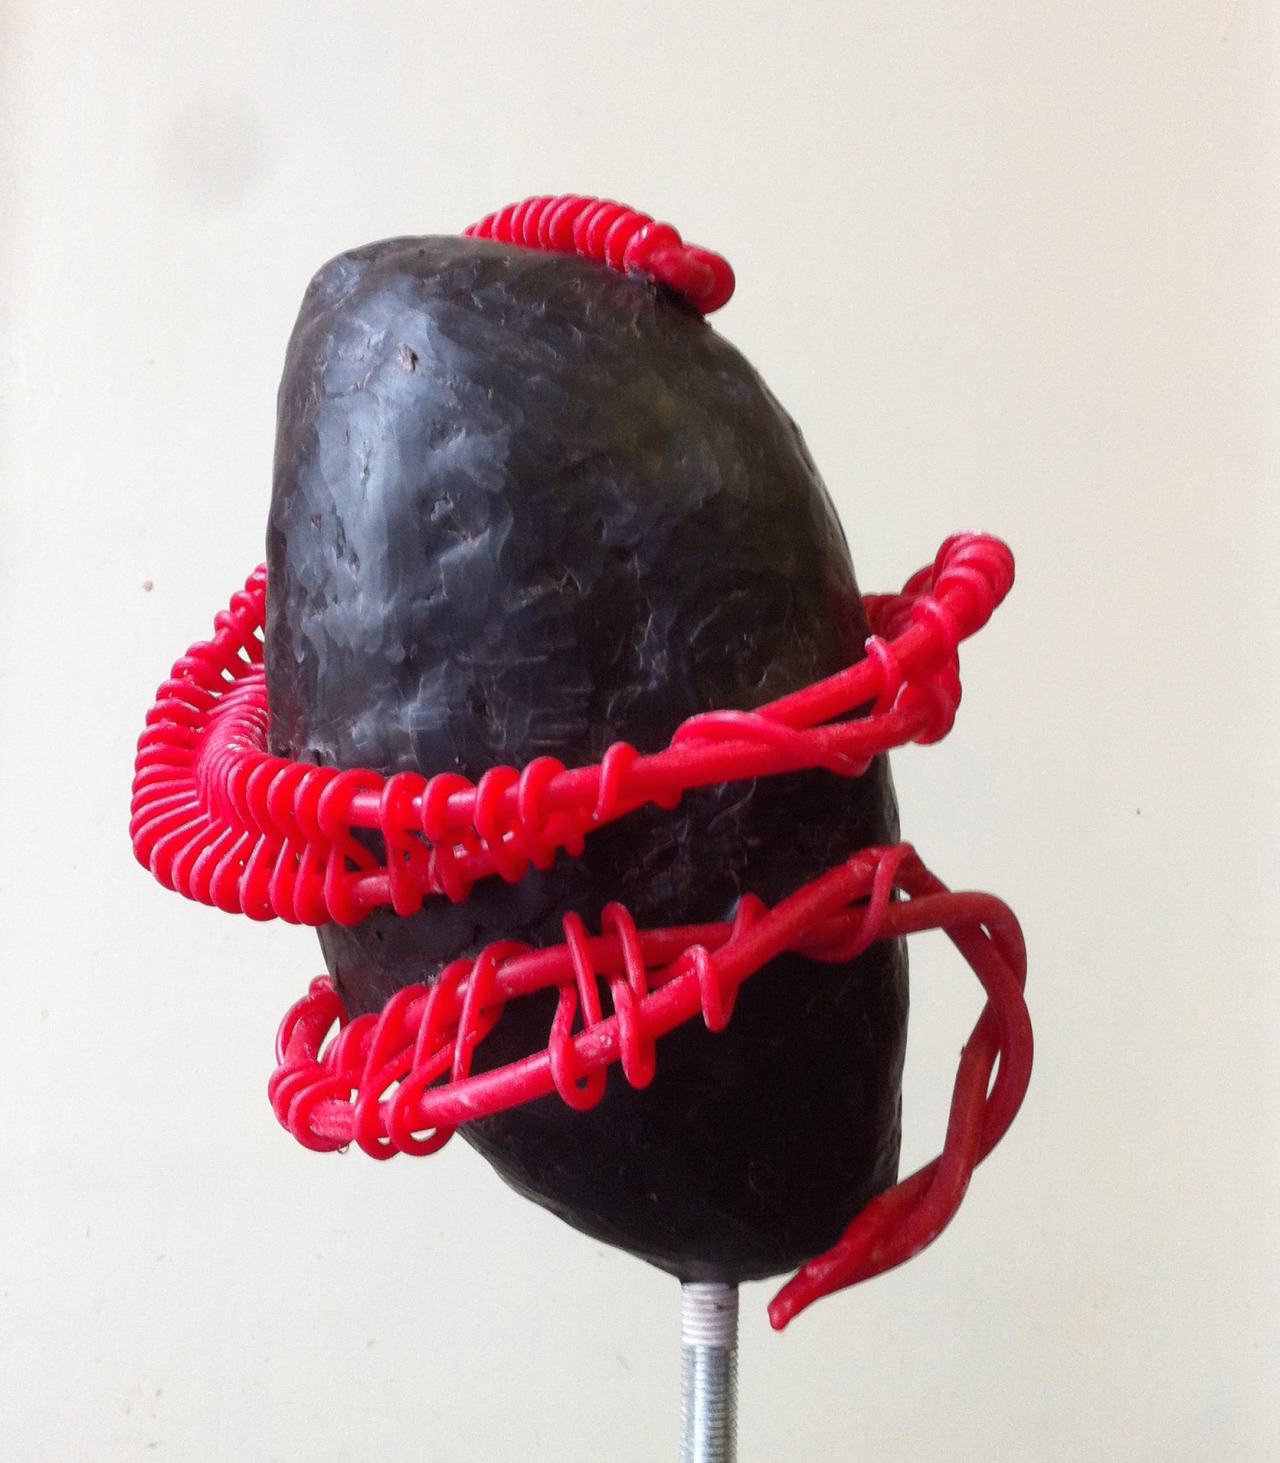
Introducing a new texture

Following on from my previous post, I wanted to challenge myself to create a sculpture experiment that features both smooth and texture.
I have created a solid core, carved the shape and attached a series of guide lines of waxed thread around it used to anchor the texture.
The texture is a length of 6mm wax bent at the centre point, then taking a length of 3mm wax I have created a figure 8 weave down the length go the parallel lines. At some points I have allowed the weave to tighten and bring the parallel lines together, and at other points allowed it to widen to create interest along the length.
It has been very difficult to firstly decide how to display the weaving around the form, and secondly how to attach it without it falling off. The guide lines had to be re-applied twice as they too kept slipping off the plaster.
Eventually the weaving is attached, now for the smooth areas.
Casting Plaster for Lost Wax, Part 5 - Casting in Cardboard


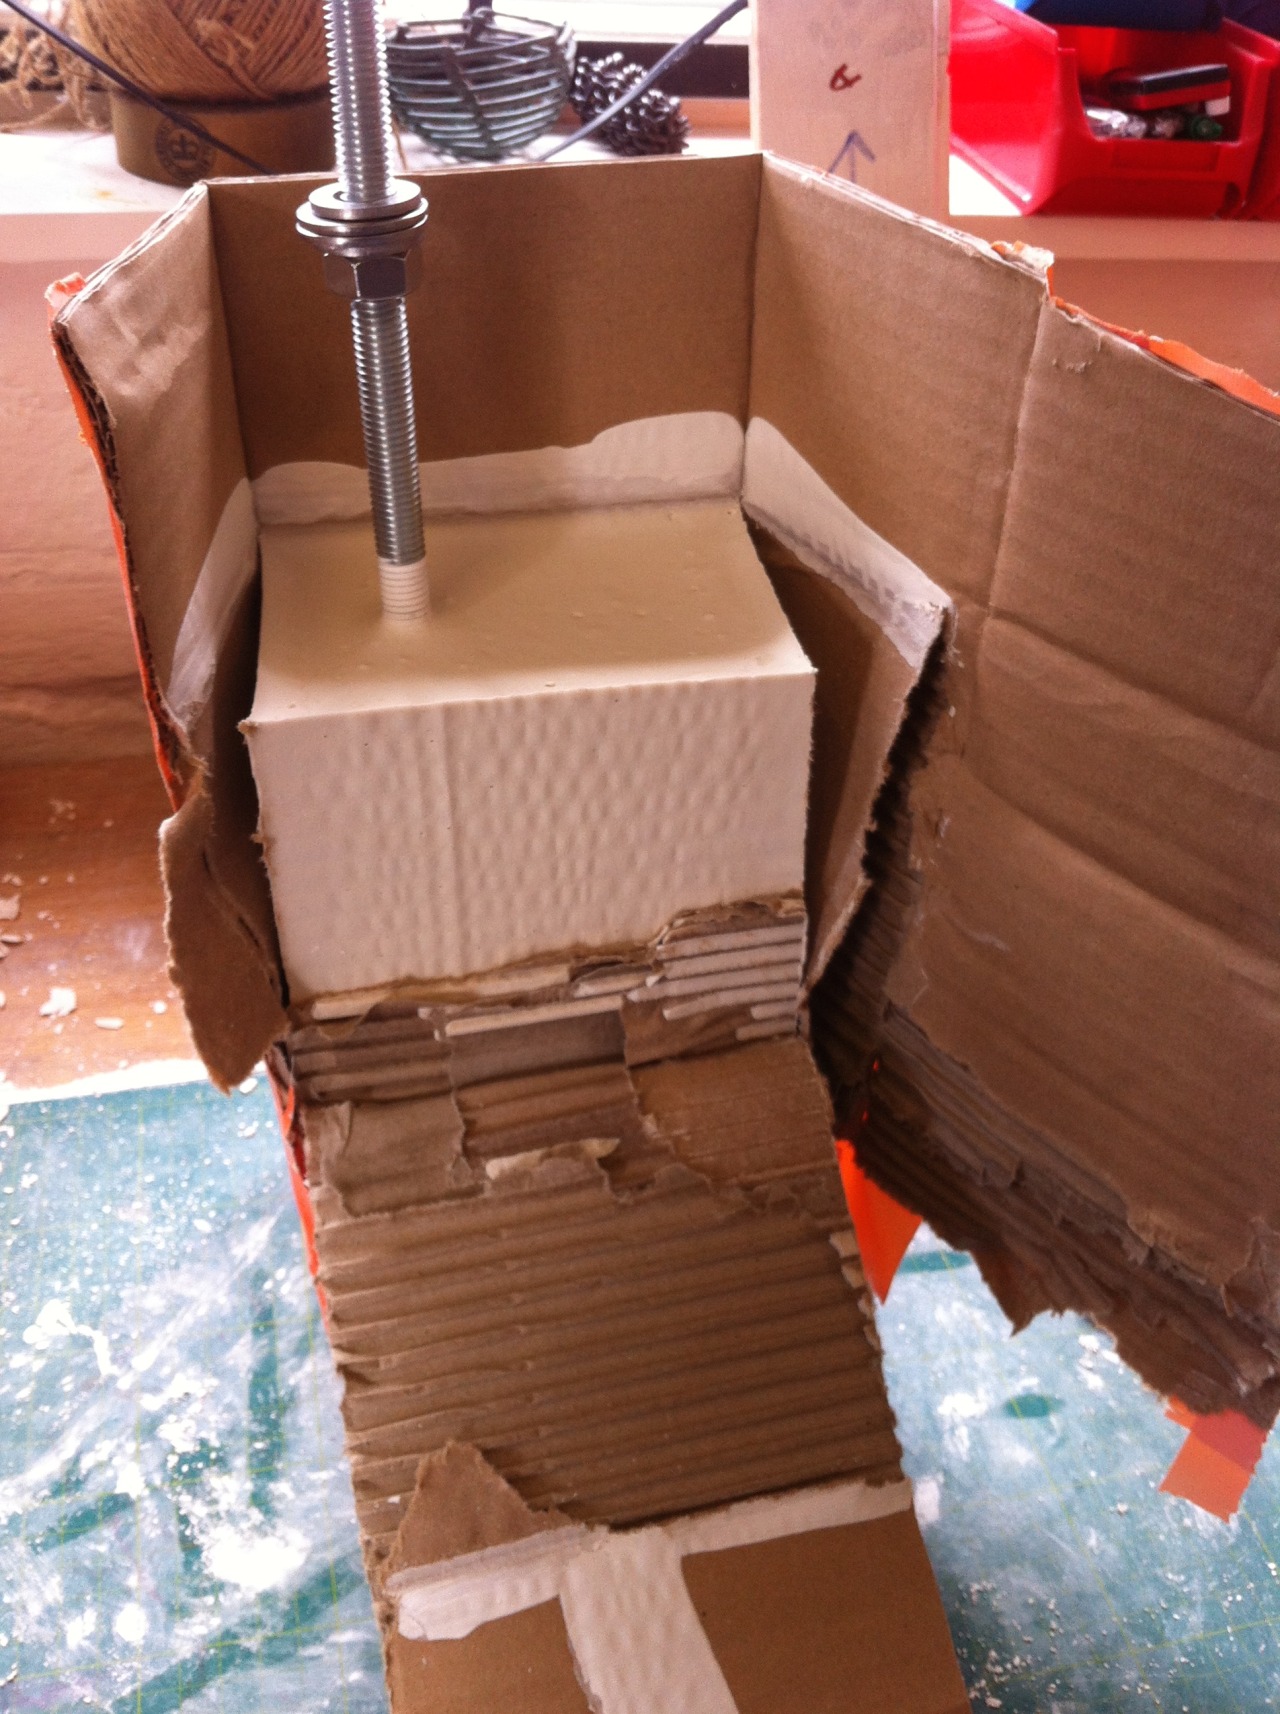


Casting Plaster for Lost Wax, Part 5 - Casting in Cardboard
In my last post I discussed the option available for cutting down on waste and time when making my plaster cores for the lost wax technique.
This is the results of trying out casting in cardboard worked extremely well. The cardboard was cut into the rough shape I required and held together with tape. To ensure the seems were strong I reinforced them with duct tape, also along every edge and across the base, anywhere I felt could be a weak spot.
Next the card board vessels were nestled into the casting bucket and foam placed around the outside to hold the cardboard still. The plaster was fixed and poured into the card, so far so good. Over to the vibrating, this was the the part that has caused other ideas to fail, and this time it worked. The foam kept the card vessels securely in place whilst the vibrating worked all the bubbles put the surface.
After 5 minutes of vibrating the metal arms were fitted and the plaster left to set and cure for 2 hours.
After the cure time, the cardboard easily ripped away as it was still damp from the plaster, then a quick shape and the plaster core’s were ready for the final carving.
This method has cut out a lot of lengthy carving and reduced on waste, a good result.
Woven Experiment No.67 - 6mm coil with sewing

Woven Experiment No.67 - 6mm coil with sewing.
This time instead of sewing through the wax, I have sewn around the wax with a needle and thread. This method worked better and gave a neater finish.
Will the cotton burn out cleanly during casting? Could it be used to span sections and remain with the wax?
Woven Experiment No.66 - 6mm wax coil held by sewing

Woven Experiment No.66 - 6mm wax coil held by sewing.
I actually sewed this sample together with a needle and thread to see if it would work. It was very difficult to pass the needle through the wax and I ended up pushing the needle through my finger tip! After purchasing a thimble I continued. The movement of the needle passing through the wax caused it to weaken and snap. I won’t be sewing anymore wax together with a needle. #lostwax #sewing #art
Woven Experiment No.65 - Larger open freeform without a core


Woven Experiment No.65 - Larger open freeform without a core
The aim of this experiment was to see if a larger form could be woven without the use of a core and if it would hold itself without sagging. It began with lengths of 6mm wax held together with figure 8 weaving in 3mm wax. The spaces left between the guide lines were then filled with crochet work.
There were movement in the wax and it required a more delicate touch with the wax, but the result is much more fluid than working the wax over a core. It is more organic in appearance and the weaving is more open and light.
My only concerns if the weave is too open, will this cause a problem for the foundry? will it cast well?
There is a degree of movement even after the piece is complete, so to hold the shape I have inserted a plastic bag in the inside space and filled it with polystyrene chipping, and then fastened the bag. It seems to be holding well, the foundry may even be able to invest the outer areas of the piece first, then remove the bag and its contents before completing the investment stage.
Woven Experiment No.64 - Freeform crochet weave

Woven Experiment No.64 - Freeform crochet weave without a core using a teardrop of 6mm wax held with figure 8 weave.
I wanted to see if I could weave without using a core of plaster and what the results would be like. The finished piece is small and very light weight, I can rotate it as I work and easily apply weaving on any side. The finished wax piece is holding it’s own shape well, but this may be due to it’s small size. Perhaps I should try another Freeform weave but larger.
#wax #crochet #lostwax #art
Woven Experiment No.63 - Double alternating Clove Hitch

Woven Experiment No.63 - Double alternating Clove Hitch in wax thread using 6mm wax as an anchor cord.
The results are very neat, but how they might apply to a more 3d shape I’m not sure. Onwards with more experiments. #wax #macrame #art
Woven Experiment No.62 - Small coil with Clove Hitch Stitching

Woven Experiment No.62 - Small coil with Clove Hitch Stitching.
This is much neater than the previous experiment, more control over the knotting, but I prefer the pattern on the inside of the coil. I wonder if I can knot the clove hitch the wrong way around?
#lostwax #macrame