Your Custom Text Here
New Idea for sculpture


New idea
If you can remember back when I cast my first piece of investment plaster and it got stuck in the bucket, well when it finally came out of the bucket it wasn’t usable so I put it to one side.
I had a unused block, a tub of wax end pieces and my wax welder and I kept returning to them during my research wondering if there is something I could do with them. Last year I attended a great course at YSP (Yorkshire Sculpture Park) on casting wax from clay originals. One of the pieces of equipment wax a wax kettle for melting large quantities of wax for pouring into plaster moulds. I wondered, could I carve the waste section of plaster and the cover it with melted wax? Yes, possibly but two problems, first I don’t have a wax kettle and second how do you safely pour molten wax over an item?
Then the idea struck, I have a welder, why can’t I turn up the temperature and simply touch the wax to the tip to melt it, then catch the drips on the plaster.
It works so I will go and melt and report back.
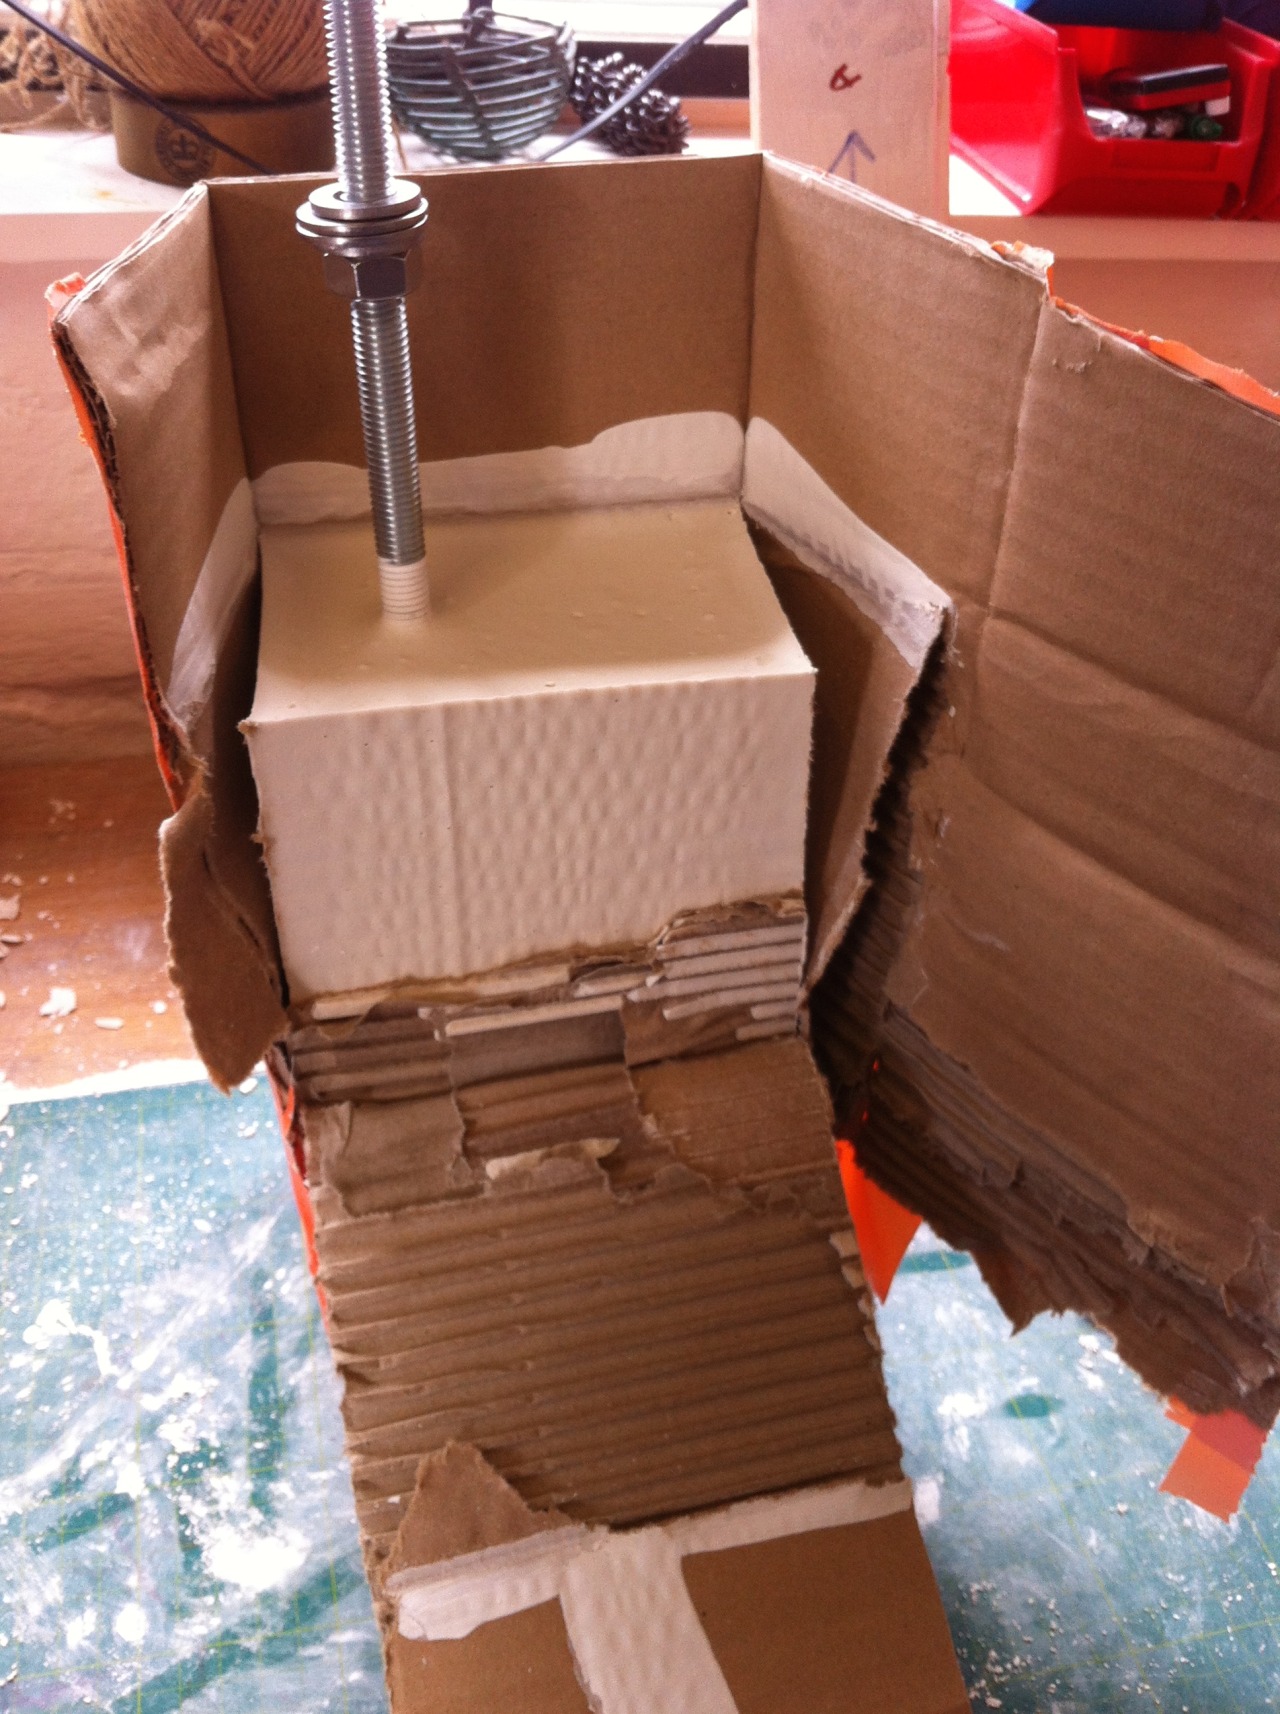
Casting Plaster for Lost Wax, Part 5 - Casting in Cardboard


Casting Plaster for Lost Wax, Part 5 - Casting in Cardboard
In my last post I discussed the option available for cutting down on waste and time when making my plaster cores for the lost wax technique.
This is the results of trying out casting in cardboard worked extremely well. The cardboard was cut into the rough shape I required and held together with tape. To ensure the seems were strong I reinforced them with duct tape, also along every edge and across the base, anywhere I felt could be a weak spot.
Next the card board vessels were nestled into the casting bucket and foam placed around the outside to hold the cardboard still. The plaster was fixed and poured into the card, so far so good. Over to the vibrating, this was the the part that has caused other ideas to fail, and this time it worked. The foam kept the card vessels securely in place whilst the vibrating worked all the bubbles put the surface.
After 5 minutes of vibrating the metal arms were fitted and the plaster left to set and cure for 2 hours.
After the cure time, the cardboard easily ripped away as it was still damp from the plaster, then a quick shape and the plaster core’s were ready for the final carving.
This method has cut out a lot of lengthy carving and reduced on waste, a good result.
Casting plaster for Lost Wax - Part 4
I have now created 3 wax pieces that are worked over a solid plaster core to varying degrees of success. The process of making the core is very lengthy; preparing the casting bucket, mixing the plaster, vibrating the plaster, fixing in the metal arm and letting it set. Once set there is a lot of carving and shaping work to get the desired shape with a lot of waste material.
Is there a better method?
I’ve had a few ideas of how to either reduce time or materials or both.
1. Balloons - Filling a strong balloon with the plaster that would give a nice smooth shape without the need to carve. How would the balloon withstand the vibrating? Could the metal arm still be fixed into the plaster?
2. Cardboard - Make the shape in thick cardboard, reinforced with parcel tape. The plaster is poured in and the card can be cut away once set. There still would be some degree of carving to finish
3. Lego Bricks - One of my artist friends who makes Glass art uses Lego bricks to make her walls for plaster casting. Would this be able to withstand the vibrations?
4. Sand Casting - Now I know this would not work as the vibrations would dislodge the sand.
5. Plastic Bags - Much like the ballon idea could a bag be moulded in some way by knotting off areas of the bag to create the rough shape? This would need support during vibrating, perhaps with foam. Or would the bag simply sag into the foam. Perhaps the bag could be suspended?
6. Latex Moulds - This is a method that once a shape had been designed could be used repeatedly to create a shape that is smooth, requires no carving and most importantly reduces waste and therefore reduces cost of materials. Only snag, I don’t know anything about making latex moulds.
Conclusion-I need to try some of these and research the others.
Weaving on a Plaster Core, the results so far
So far the results of the three weaves on plaster have been varied and have created more problems than solving them. Heres some of the problems I have encountered:
1. The lack of the visible negative space has meant it is very difficult to view the effect of the sculpture.
2. The plaster core is heavy and is mounted on a cross plate. The piece can be spun around but only on one axis and I have gotten so used to be able to turn my pieces in any direction to allow the weave to flow across the surface.
3. The underside of the sculpture sags so to prevent this happening each piece has to be bound with strips of plastic to prevent movement. Alternate fixing is using lengths of waxed thread but I am concerned about over using the thread incase it prevents a clean burn out at the next stage of the lost wax casting.
4. Using a thick guide line works well at the beginning of the weaving process to mark out the shape you wish to create with your weave, but when you need to anchor the main weave to the guide it requires a degree of give which it doesn’t have. If the guide line was first applied with ample room for anchoring the later weaving then this would solve the problem, but it creates another as the guide line would simply fall off the plaster core.
Does this method of solid core casting need to have a core of plaster?
Can the core be added at a later stage and a more flexible light weight core be used?
Woven Experiment No.59

Solid plaster core cast and carved ready for the next woven experiment
Casting Plaster for Lost-wax - Part 3
The experiments so far trying to cast a block of investment plaster have been varied and I am determined to get this right. So the mix recipe is working, I am getting a smooth plaster, but when casting I need to consider the horizontal expansion especially when using rubber buckets.
Sometimes the answer can appear where you least expect it. I was taking out some rubbish to the large bin outside. The bin is shared between all the studios at the Ferrers Centre and it was almost overflowing being bin day. Sticking out the top was a collection of foam sheets, one of the studios has a Upholsterer and they must have stripped an old seat and discard the foam to replace it with new foam. Thats when I had my eureka moment, the problem with my last experiment was choosing polystyrene chips to line my bucket, but they vibrated out of the bucket, but foam would not vibrate out. I took the foam.
New plan
Step 1 - Line the larger bucket with sheets of upholstery foam, then line with polythene sheeting
Step 2 - Pour in the plaster mix, vibrate and leave to set
I have now lined my bucket with the sheets of foam and lined it with plastic, easy so far. I have mixed up a batch of plaster and poured it into the prepared bucket and placed it on the vibrating plate.
Success! the vibrating does not dislodge the foam and it is working so far. Just go to wait 2 hours until its set to see if my plan has worked.
Fingers crossed
Casting Plaster for Lost-wax - Part 1
My research into solid body casting has reached the final stage and I am now ready to start creating the final works in wax. Before I can begin the wax weaving I need to create my plaster cores from blocks of investment plaster, carve them into the required shape and fit a metal arm through the centre of each block.
The plaster suppliers and the foundry suggested a 38% plaster/water ratio but this recipe seemed to me to be too much plaster and not enough water. After careful working out it seems that this ratio of 100% powder to 38% water is the mix favoured by the foundry for their investments, so it must be correct. I still have my doubts as I generally use a 50% mix when casting my fine casting plaster blocks for carving.
The technical data sheet also suggested a water temperature of 20-30°c and a mixing time of 8-10 minutes and a setting time of 10-15 minutes.
I carefully measured out my water and made sure the temperature was between the desired temperatures, then began adding the plaster using the sifting method of gently scattering the plaster onto the surface of the water. When 2/3rd’s of the way through the measure of plaster, peaks began forming on the surface of the water, which generally means the water can’t take any more plaster, but I still had plaster left over. Deciding to stick to the provided recipe I continued sifting more plaster until I had added the required amount and it now sat upon the surface of the water and did not want to be absorbed.
Stirring the plaster to combine the water and plaster fully was very difficult and was the consistency of thick porridge, but after 2 - 3 minutes of stirring the plaster did become smoother and resemble a thick custard.
To remove the bubbles I placed the plaster mix on my new vibrating plate (or as readers of my blog will have read, my fat busting weight loss machine) for 5 minutes of vibrating to bring any bubbles to the surface.
After vibrating I left the plaster to set for 2 hours as suggested, thats when the problems occurred.
Unbeknown to me, as the plaster was setting it began to expand slightly, this would be fine if it had expanded vertically into the empty space in the bucket, but no, it expanded horizontally. The buckets I use for casting are rubbery so that it is easy to remove the plaster once set, but this new plaster pushed the sides of the bucket, which being rubbery stretched with the plaster. When I turned the bucket over after 2 hours of setting time and gave it a few knocks with the mallet and was surprised that it didn’t fall out as the fine casting plaster blocks usually do. This is when I noticed the slightly bulging sides and realised the plaster was not going to simply fall out of the bucket but was well and truly stuck!
After chiseling away at the sides for what seemed like ages, did the plaster finally give way and come out of the bucket. The bucket being rubbery simply went back to its original shape, but now I have a problem. I have a collection of different sized rubber buckets for casting and this new plaster is going to expand and thus get stuck.
I need to figure out a method of using my rubber buckets but prevent them from stretching.
Weaving onto plaster. Part 2
After looking at the experiments no’s 53,54 & 55, I thought I would try a different shape and created Woven Experiment No.56.
Firstly the wider hole has worked well in allowing me to be able to pass the weave through the plaster more successfully. The convex shape is giving a snug fit to the weave, but the weave is not working over the pointed ends of the plaster shape so this would be lost in the casting. Does the loss of the points matter?
The smooth and texture of the plaster and weaving is looking good but the plaster won’t be in the new work and will leave a void. Could a multi textured sculpture be achievable? Could a smooth was be applied to areas of the plaster form and then a textural woven wax applied over the top?
Maybe a very simple convex shape would work for a basis for an application of smooth wax then pattern and shapes added with a texture.
This would make an interesting combination of rough and smooth, combing the two textures that visitors have enjoyed experiencing.
Woven Experiment No.56 - Carved Plaster form bound with crochet chain stitch

Woven Experiment No.56 - Carved Plaster form bound with crochet chain stitch in orange 1mm waxed cotton thread
The wider hole has worked well in allowing the weave to pass through the plaster. The convex shape is working well and the weave is fitting to the surface snuggly, but the weave is not working over the pointed parts of the plaster. This area would be lost when the casting takes place but does it matter?
Would it be noce to keep a solid and a weave? It would be an interesting contrast to have a solid form bound in a chainlike weave or pattern.
Woven Experiment No.55 - Carved Plaster form

Woven Experiment No.55 - Carved Plaster form bound with crochet chain stitch in green 3mm thread